
Working on vehicles is dangerous. Mechanics are trained in how to do it safely. If you choose to work on your own vehicle, DO SO AT YOUR OWN RISK. This page is simply an account for how my experience went.
Replacing Dodge Dakota Ball Joints
My current vehicle is a 2000 Dodge Dakota V8 sport edition. I bought it with about 90k miles on it in good shape, just had all the fluids changed, came from South Dakota so rust was nonexistent. I was driving it for a while until I felt like the front end was clunking and shifting so I jacked it up and was checking everything out. With the wheels in the air I turned the steering wheel to listen for odd noises and KABOOM! The driver side upper ball joint snapped out of its socket.

Here I had already removed the wheel, brake caliper (sitting on upper control arm), and had the socket on the tie rod nut ready to remove it.

Here’s a close-up of the snapped out joint. Notice how dry, pitted, and deformed that ball is. Dodge decided not to use grease-able joints. There joints are greased and sealed from the factory ready to go. Of course rain will inevitably get in there, and especially if the truck is submerged off-roading (and who doesn't take a sport truck through the mud?). Eventually the joint will fail... A lot of people gripe about Dodge's decision to use non grease-able joints but keep in mind this joint lasted 10 years of abuse... Many vehicles wear through ball joints at around 100k miles anyway.

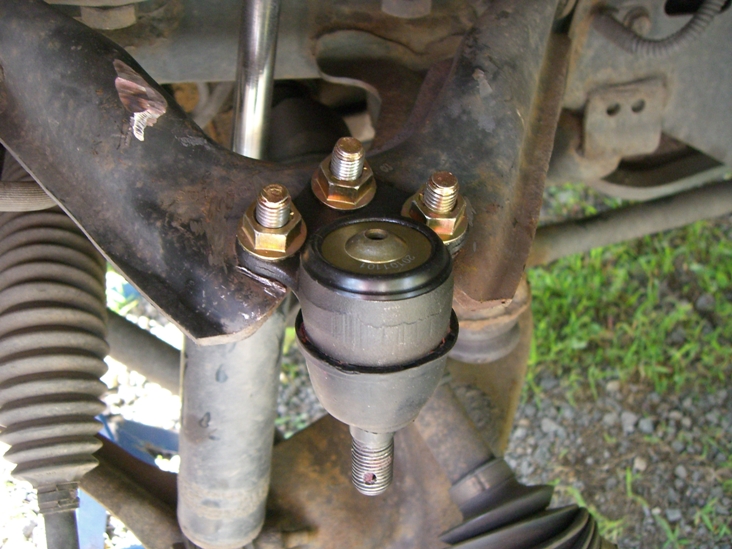
A birds eye view of everything. The shaft can be pushed out of the way when the upper ball joint is removed and the shaft nut is removed. To remove the shaft nut, remove the cotter pin, then slide off the stamped steel piece acting as the castle part to the nut. There will be a spring washer behind this. Then remove the nut and the washer behind it. The nut should not be torqued down to an inhuman strength as its designe is similar to that of a castle nut. If the shaft won’t budge (see how the splines are lightly rusted), take a soft mallet and give it a thwack. It will be a bit of a challenge to get it out, just be carefull not to ruin the threads the shaft nut rides on. Tie it out of the way.

The steering knuckle has been removed leaving the upper and lower ball joints connected to the control arms. You will definitely have trouble separating the steering knuckle from the control arms as it is stuck on the taper of the ball joints. Though pickle forks do work sometimes, I have heard a pitman arm puller will make quick work of detaching the steering knuckle. Note that because the steering knuckle is held by the taper of the ball joints stem, when it pops off, it really pops off. Just be ready for it, and don't have any body parts near or under the knuckle as you are removing it.

It always seems the kit you rent to press out the lower ball joints does not contain the right size spacers... The lower ball joints are pressed in with a lot of force. Just make sure everything is lined up so you don’t crack things that aren’t yours.
Since the upper ball joint is riveted in, you can buy a new upper control arm with the new ball joint riveted in, or (more popular), you can remove the rivets and replace them with bolts and a new upper ball joint. To remove the rivets you will need to take an angle grinder to them. Takes about 20 minutes of grinding, a good work out. Grind through the head and then use a punch to knock the rest of the rivets out. You will need to put a piece of wood under the control arm as it is springy. Buy XRF ball joints. Buy XRF ball joints. They are the best you can buy... Don't waste your money on moog or anything else from the local auto parts store. XRF are the best you can get. The one pictured is not an XRF, thus I ended up doing this twice in the year. With XRF, your joints will outlive the vehicle.

The upper and lowers are both pressed in an connected. Pressing the lower joint in is easier than pressing the old one out. The new ones come with a snap ring for the top so make sure you press it in far enough to install the snap ring. Forgot to mention earlier, TAKE THE TENSION OFF THE TORSION BAR. You will never be able to lift the lower control arm up with all the tension pushing it down. You will end up lifting the vehicle with it. Here’s how it goes; install upper ball joint, install lower ball joint, install steering knuckle onto lower ball joint, raise lower control arm with steering knuckle attached until it meets the upper ball joint (put a jack under the lower control arm and pump upwards), then attach upper ball joint, attach tie rod. Before you do all of that, take the tension out of the torsion bar by loosening the nut that drives the keyway which puts stress on the bar to lift the vehicle (should be by the cross member). Never loosen the ball joint nuts once you tighten them down. They are castle nuts driving the steering knuckle up a tapered stem. Tighten, stop, install cotter pin. Done.

As you can see, the jack makes raising the lower control arm much easier. Be careful not to smash any of these threads. I did and it was a pain to take a hacksaw and carefully cut of the smashed section while lying on my back.

Half way through this I decided to get new Timken wheel bearings and install them.

I decided to do this during the passenger side so I did not install the driver side bearing until months later when I had to do the ball joints again. Cleaned and painted everything black. I highly recommend cleaning and painting parts. Makes everything go together nicely.

Looks brand new!

Now the passenger side. Notice I have the new upper and lower ball joints installed. Next it is time for the steering knuckle.

Make sure you stay cool when working on a hot summer day. Notice how the jack stands support the vehicle but the jack is there any way as a safety. It’s not applying any pressure to the vehicle but in the event one of the stands fails it will catch my truck from falling on top of me. I've said it before but if you chose to do any work to your own vehicle, DO SO AT YOUR OWN RISK!

The new wheel bearing installed. The old one is pressed in, so loosen the three bolts holding it in about 4 turns, then support the knuckle on blocks of wood and hit the three bolts sequentially, then loosen them another 2 turns and hit again. Each time you hit, you should drive the bearing out just a little but you need to drive it out straight so hit one bolt then the next. Once you knock it out about a 1/4 inch it should pop out, then just remove the bolts. Installing the new one is easy. Just tighten each bolt a little at a time. This will pull the new bearing back into the pressed fitting.

The old bearing is old!

Everything reinstalled looking nice and clean. Don't forget the shaft nut and washers.

Probably one of Dodges biggest problems is the threads in the steering knuckle for the posts on which the caliper ride (2 posts) strip out easily. I did not strip these. Whoever did the last break job misaligned the threads then with an air ratchet just ran the posts down and smashed the threads -__-. It was not a welcome surprise. There are several options you have; drill larger holes and tap (this requires you make new posts ie the bolts), drill and tap for a heli-coil kit (can reuse old posts, my posts had garbage threads)), drill and weld in new threads from a coupler. I went with the first options to drill larger holes, tap, and make new posts. Unfortunately I did not check my tap sizes I had available and after drilling a wrong size hole I later needed to go up to a half inch leaving almost no material on 1 side of each post. Later on I went with option three which you can see in a different project page.

I cleaned the paint around the holes and added some extra metal. I bent the metal into an L shape and welded it in being careful not to melt the threads with the heat of welding. The L shape doubled as strength material for the weak side and provided something for the posts to torque into (stop them from traveling forward).

They ended up looking like this. I ground away at the extra metal so nothing would drive the brake pads into the rotor. Again this was only a temporary solution for a little while until I was able to do something more permanent.